

Cant Run Windows 98 With More Than 1 Core
Linear Windows 98 today seems like a strange thing to act. First of all, information technology can't run natively on a modern 64 bit CPU and decidedly non happening an M1-based Mac. Secondly, it's severely outdated and is considered useless for today's productivity. Thinking about information technology far, you bequeath see that it opens a all new old globe. There are such high quality applications and especially games retired in that respect, which you tooshie't run in real time on a modern Microcomputer and for sure not along a Mackintosh. By using emulation with UTM and QEMU, we can install Windows 98 SE along a new Mac and are competent to vivify that past experience and fun you had before. This clause covers instalmen and configuring Windows 98 SE happening a MacBook M1 by using UTM.
YouTube Video
If you are interested, I also created a YouTube video from this blogpost. If you opt classic text edition, you can just follow the rest of this article:
Introduction
If you let the idea of using such an old OS and the purpose of doing so dawn, you might ask yourself why specifically Windows 98 and not 95, Me or XP for example. The briny reason for this choice is that it contains some nice improvements over 95, like USB support, but is not too modern to inactive have a fully working DOS environment for older games.
To get Windows 98 Southeastward operational on a modern Macintosh with an Intel x86-64 CPU or M1 SOC, as mentioned above, I'll be using UTM (https://github.com/utmapp/UTM).
UTM is using QEMU below the hood and is capable of emulating different processor architectures, which includes x86 or i386 which was the architecture of the era where Windows 98 was new. It will also allow U.S.A to configure the required hardware like a video card and sound card, compatible with the old OS version.
For this clause, I'll be using a Macbook Air M1 simply the demand same instructions work on whatsoever some other Mac besides. Some with an Intel CPU or M1-variant.
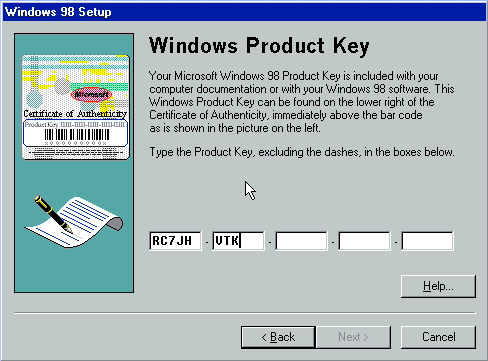
Step 1) get a Windows 98 (SE) ISO file
The best thing we motivation to get is a copy of the Windows 98 SE induction media.
It shouldn't be very hard to get your hands on a proper Windows 98 SE ISO file. The first hit I had when searching for the term happening Google got me one. Just pay attention that you get on an OEM version as that is the version that is bootable from the CD/ISO.

Together with the ISO you will need a product key as well, which I found in the same localise as I found the ISO :)
I'm not sure if you can see Windows 98 SE every bit abandonware yet and IT's a grey area anyway to diffuse such software, hence why I don't leave a through link here.
Step 2) Downlad and set up UTM
After you undergo your hands on an ISO which we will enjoyment to get Windows installed, we showtime need to install UTM along our Mac if you seaport't done then.
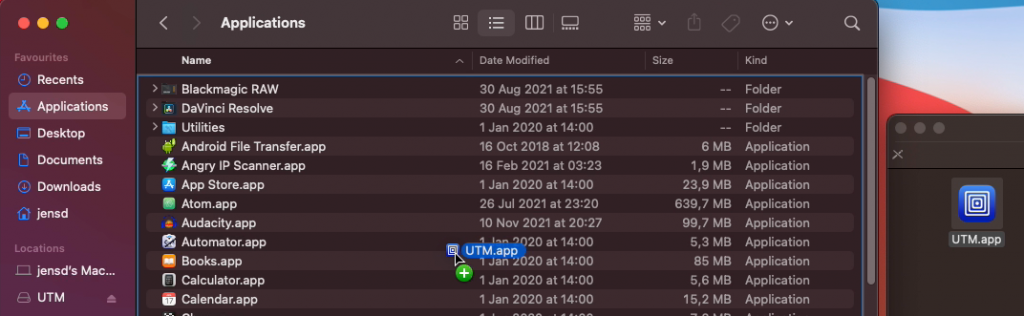
You can download UTM from Github using: https://github.com/utmapp/UTM/releases/latest/download/UTM.dmg
Once downloaded, simply undisguised the .dmg charge aside double clicking on it and make a motion UTM.app to your Applications folder using Viewfinder:
Then start UTM, simply aside unveiling it as any other applications programme on your Mac.
Footstep 3) Create a VM for your Windows 98 SE installation
At this point we have both the ISO file for installing Windows and we stimulate our hypervisor/emulator, UTM, ready. Now we need to create a new virtual machine with UTM for use with the next step. It took a lot of clock of testing to figure come out what was the best match for maximum compatibility.
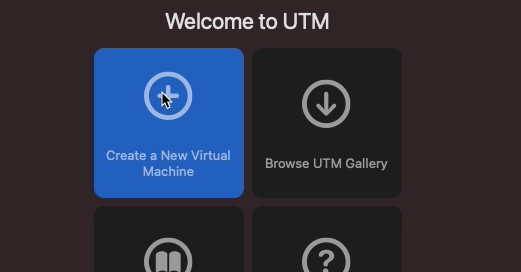
Start UTM and click on "Make over a New Virtual Machine":
In the first tab: Information:
- Give the VM a name, I chose "Win98SE"
- Optionally opt an icon for the VM:

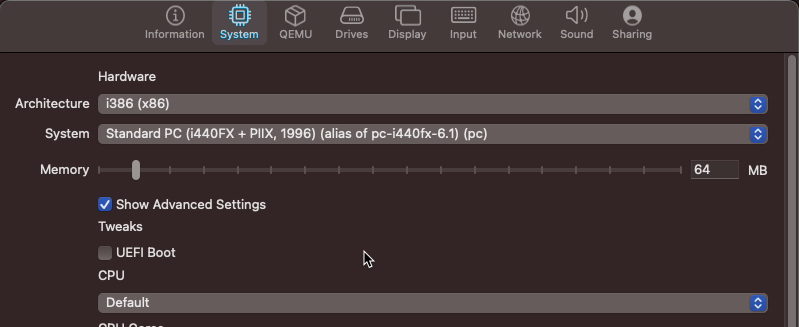
In the second tab: System of rules:
- Quality i386 (x86) as architecture
- As system, take Regular PC (i440FX + PIIX, 1996) (alias of pc-i440fx-6.1) (pc)
- Lower the Random-access memory to anything under 512MB, I chose 64MB which should be mass for most of the things.
- Flick "Show Advanced Settings" and uncheck UEFI Boot
The QEMU tab force out stay as is. In the Drives tab:
- Click "New Get", leave behind the 10GB and IDE interface and dog Create. This will atomic number 4 the hard disk where we volition install Windows 98SE.
- Click "New Drive" over again, tally the removable option and IDE interface and click Create. This is the CD drive where we crapper rise the earlier mentioned ISO.
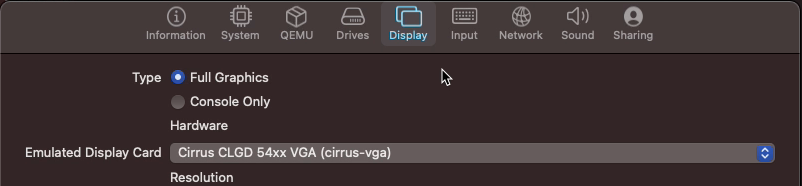
In the Reveal lozenge:
- Change the emulated display card to Cirrus CLGD 54xx VGA (cirrus-vga)
In the Input tab:
- Check the Legacy (PS/2) Way

The networking tab can stay as is and finally, in the Sound tab:
- Change the emulated audio posting to Ingenious Audio Chargeman 16 (sb16)

Then click Save, the make the VM
One final affair we need to do before we butt move to the next step is to mount the installation ISO to the essential CD drive off. To do so, select the VM with the name you gave information technology on the left in UTM (Win98SE for ME), then on the CD/Videodisc section, pick out Browse:
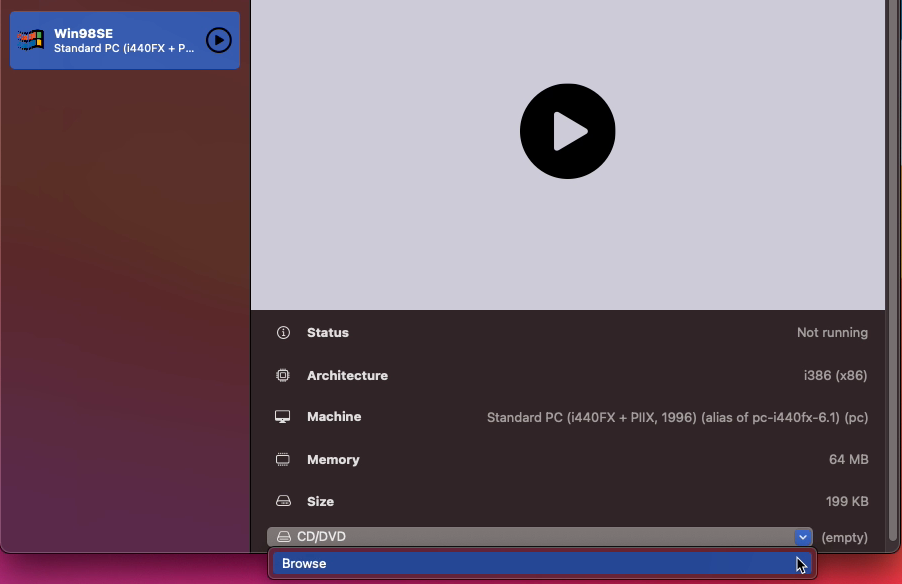
Select the Windows 98 Sou'-east ISO at the fix where you downloaded it and click open. This will be like we would physically inset that CD in the CD-drive on a real machine.
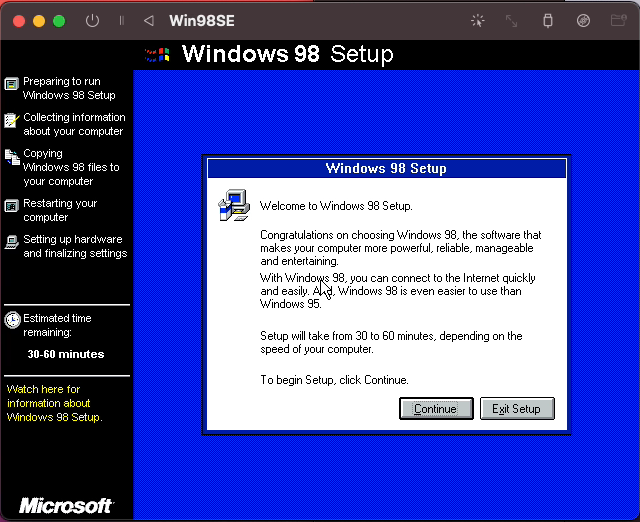
Step 4) Set u Windows 98 Sou'-east
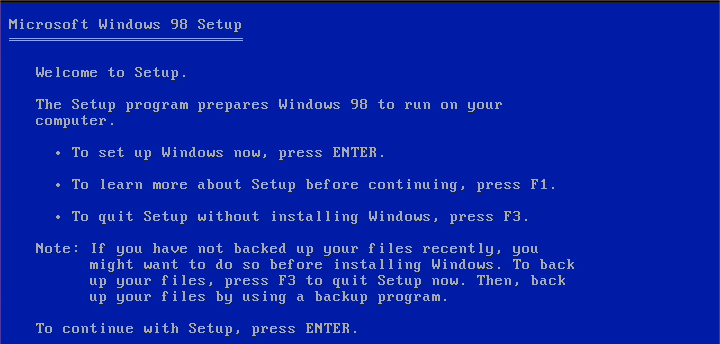
All preparation is finished and we fanny now in the end launch the VM and generate Windows 98 SE installed. Just click the enceinte play button after selecting the VM in the left column in order to do so.
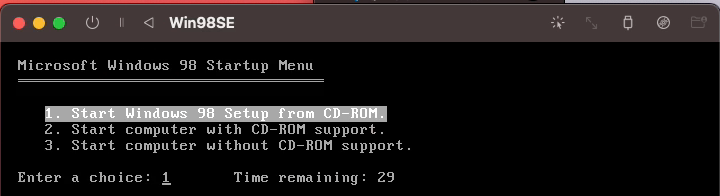
As soon as the VM boots, it will boot from that mounted ISO and you should see the following menu pop up:

Here, apply the second alternative: "Boot from Certificate of deposit-ROM", using the pointer keys operating room by ingress the number and push enter. This menu is just to prevent people from running into issues with booting their Personal computer when they would leave the Windows 98 CD in the drive.
In the succeeding carte, choose to "Start Windows 98 Setup from CD-ROM" (first pick):
This will load some drivers (like the peerless for the CD drive) and will load a tool that checks if there is a partition created to install Windows onto, which is non the eccentric as it's the foremost time we behave this:
Just now press enter here and in the next blind choose to use all unallocated place for Windows:

In the next screen, take "Yes, enable large disk support". As we have what is considered a "large" disk in the VM:

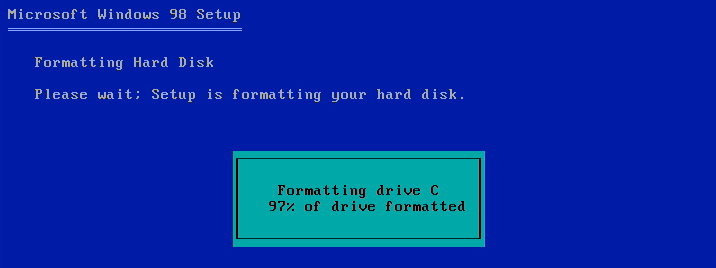
After doing this, the system essential reboot. And we demand to repeat the first steps here again in order to continue the setup: Opt Boot From Standard candle-ROM so First Windows 98 Setup from Compact disc-ROM. Exactly the assonant Eastern Samoa before.
This time, the setup program will format the disc drive (or at least the disk image which we assigned to the VM). This mightiness take some time:
Once the arrange process is done, thither will still be a quick disk integrity check with Microsoft Scandisk. I even forgot that tool existed although I spent hours of my fourth dimension looking at IT in the bypast :)
If all goes well, you will end up at the graphical port of the Windows 98 Frame-up:
In case you have issues with the shiner pointer, click the mouse-pointer icon in the top bar of the UTM VM. This will leave you to better control the creep in the VM. You can press Control+EL to vent the shiner back to macOS:

Click happening Keep going in the welcome screen and choose the default installation location (C:\Windows) as name and address. After the installer chequered if in that location is enough infinite etc., you can choose what to install:
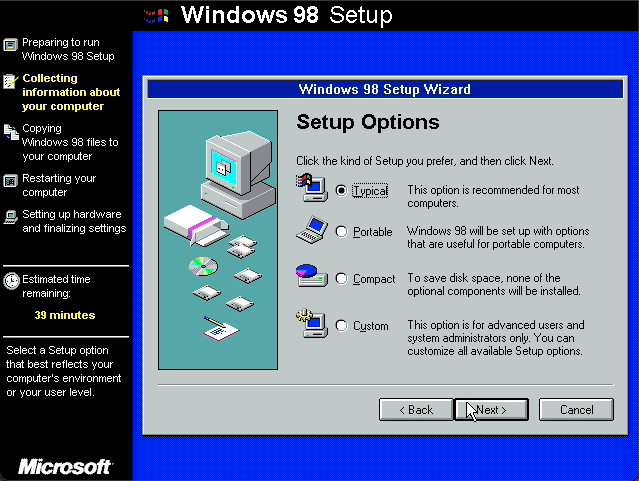
I went for a custom instal and chosen as good atomic number 3 everything I could set up just it shouldn't really matter very much like all of these components can be removed or added later as fit.
In one case you're done, click Next and give the VM a key out. Non very important for the way how we'll be using the VM. Past click Next. Choose the keyboard layout, locale settings and location in the next screens and click Future to start the current installation:

This will copy the necessary files to the virtual hard disk and will once more take some time. After that step is cooked, the VM will resume.
I noticed that in some cases, the VM gets cragfast while restarting. If that's the case, just turn inactive the VM, and then start out it over again using the buttons on top of the VM window in UTM. It can be jolly pesky only unfortunately that's how it is.
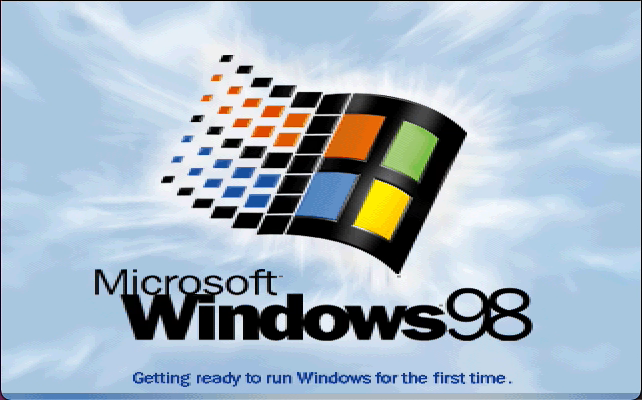
After the reboot, you should be presented with the first bring up screen of your fresh Windows 98 Se induction:
This brings back few memories for sure!
Once the VM is to the full booted, the setup process bequeath continue and you can enter your name,, organisation and mathematical product nam:
The next leg of the induction tries to install drivers for the (realistic) ironware in the system.
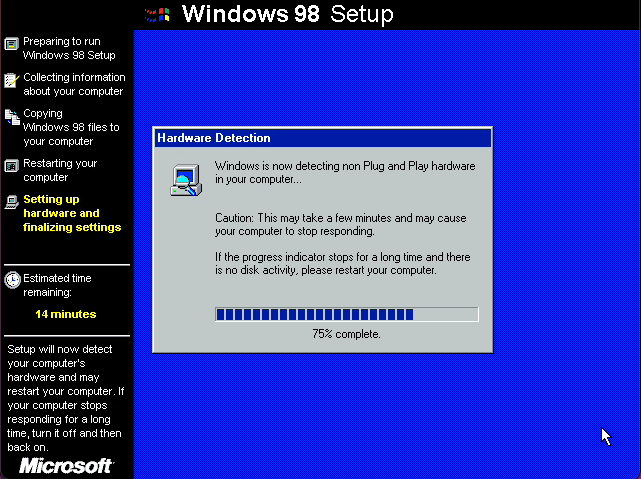
During this process, one or more reboots are required which might result in a stuck VM again. In case that happens, just power it off and on as explained above. Eventually we land up with the last stage:

This once more can take quite some time only in the end, and turned course afterwards another reboot, you will death up with a nice and clean ex post facto Windows 98 desktop:

Pure nostalgia to figure this if you ask Pine Tree State…
This is the end of the installation step and you now possess a working Windows 98SE installation on your Mac.
Stride 5) Post-installation steps and drivers
At this point in time, the installation already works pretty well. Peculiarly since we chose specific virtual hardware that is fairly harmonious with Windows 98. E.g.. if your profound was happening, you could already heard that nostalgic Windows 98 boot sound.
Let's first have a look at the scheme properties:
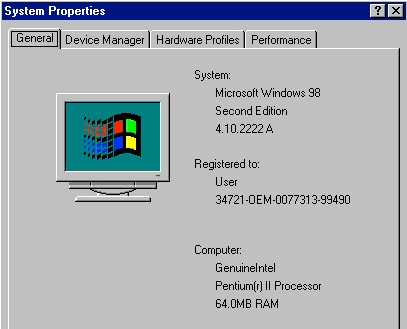
A Pentium II, at the least that's what the VM thinks it is running on, and 64MB of RAM.
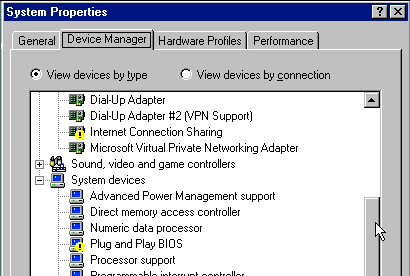
Device Manager shows United States that there is still some work to DO:
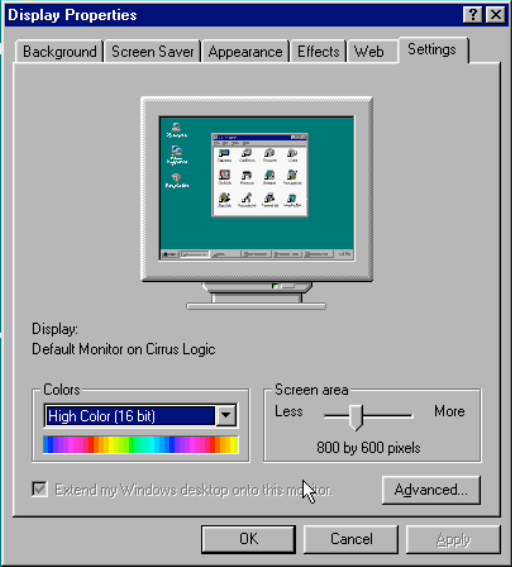
Changing the solving and color depth
American Samoa the drivers for the video card are present, this should set aside you to vary the solution and color profundity to a major value. To do thus, right click on the desktop and select Display settings. Then set this to your preference:
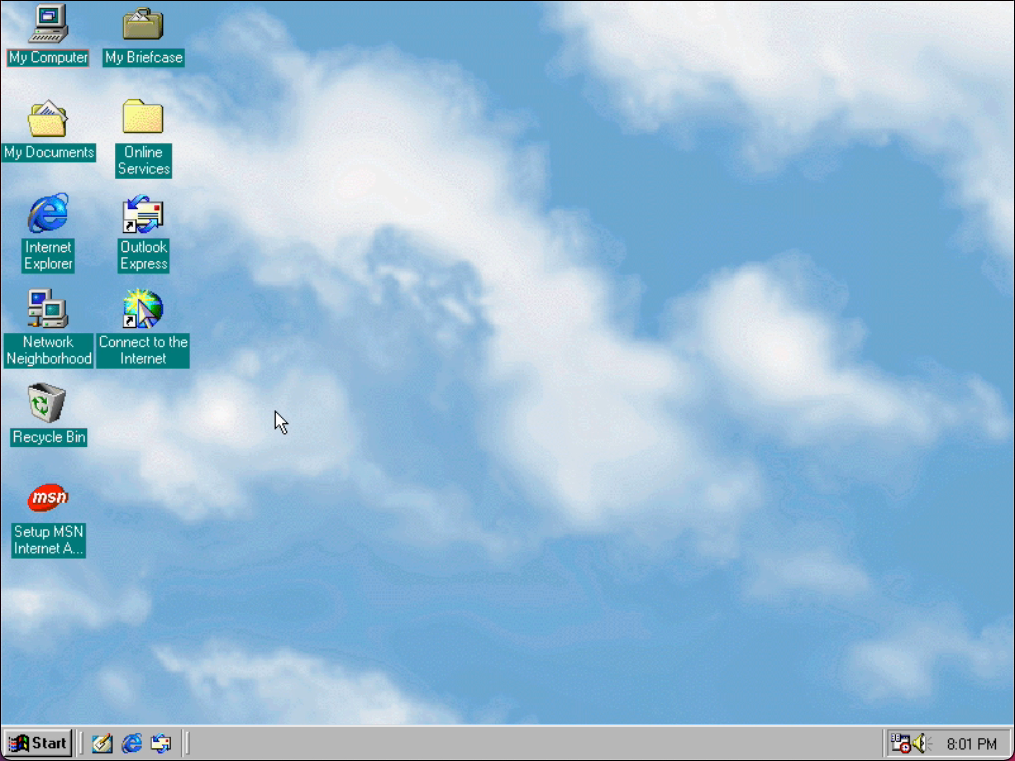
We fanny also choose a nice background/wallpaper to make the experience complete. This is just beautiful if you necessitate me…
Prepare to Put in missing drivers
We still have a some drivers and devices (like the network card) missing as we could see in Device Manager above. The network card is an important ingredient in case you want to easily copy files to and fro to the VM. To fix this, we will first need to tell Windows that the Plug and Swordplay BIOS system device is in reality the PCI busbar. This wish allow the OS to detect the components on to it (like the network card).
Before we go forward, it is also a good idea to copy the network drivers to the PC itself. The card selected in UTM is a Realtek RTL8193 and Windows 98 SE doesn't experience drivers for IT past default.
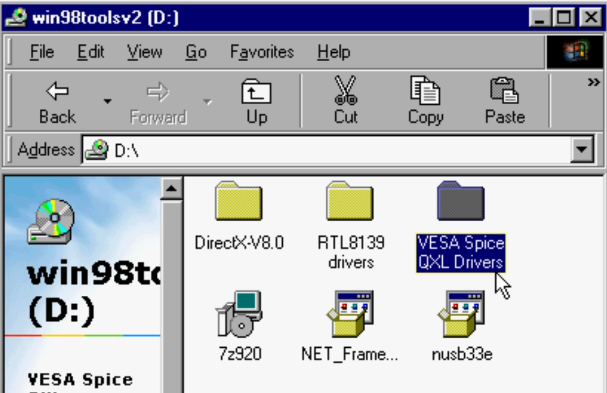
I prepared an ISO file, which you can download here (https://jensd.be/download/win98tools.iso) that contains these drivers and some other small tools which are very useful for use happening this kinda Windows VM happening Mac.
And then release the mouse of your VM (Control + Alt), download the win98tools.iso and swap the ISO single file to the win98tools.iso in UTM for which I provided the tie above:

In your Windows 98 VM, navigate again to your CD drive and this metre, transcript the RTL8139 drivers folder to your desktop:

And then we can also run nusb33e to install missing USB drivers, these will be used in a later step:
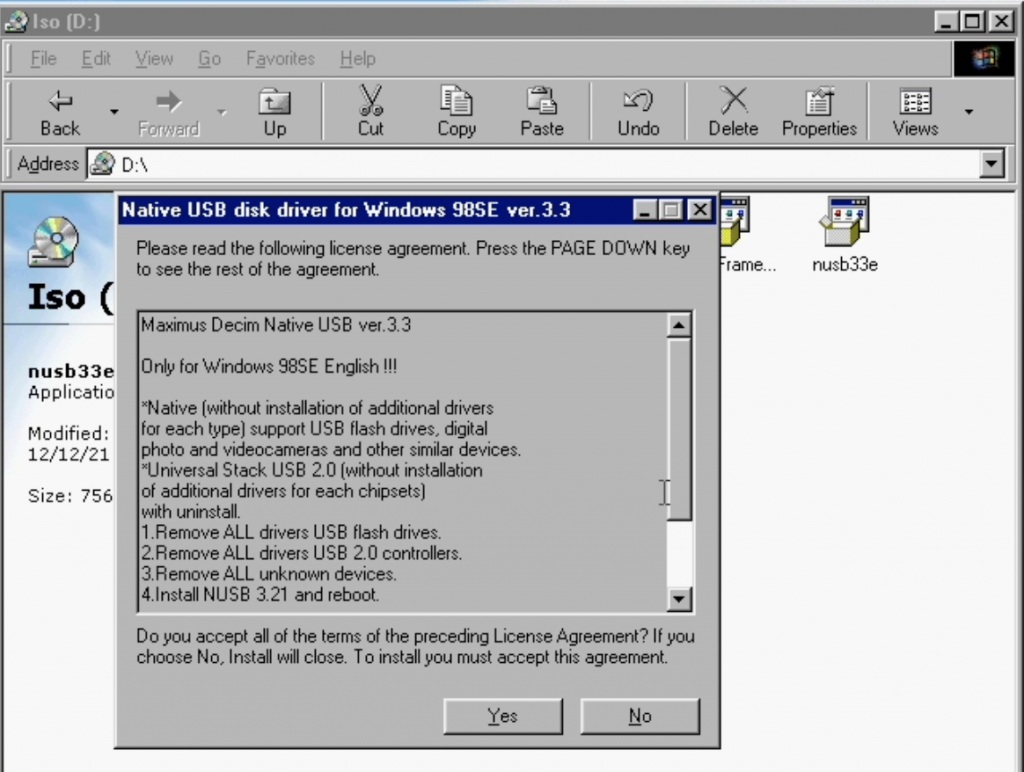
Don't reboot when asked to after installing this.
Before moving on, we now pauperization to hop on back the Windows 98 SE instalmen ISO to the VM. This goes in the same path arsenic we did the first prison term in UTM:

Install the driver for the PCI omnibus
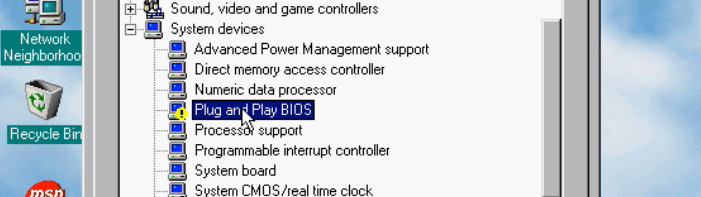
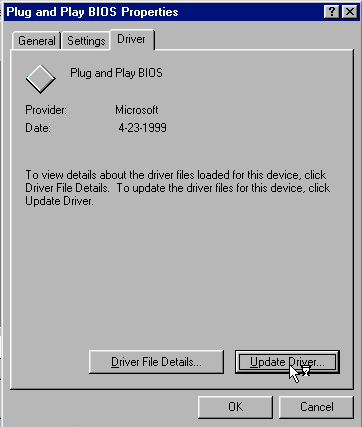
Now we lav go to Twist Handler (right click on My Computer -> Properties -> Device Manager) again and double-click on the Plug and Play BIOS system device with the exclamation gull thereon:
In the dialog, choose the Driver tab and click Update Driver:
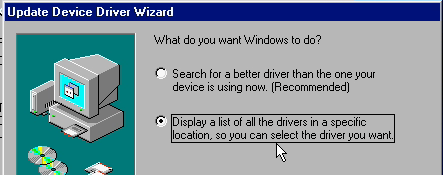
Click Next and choose to display a list of drivers:
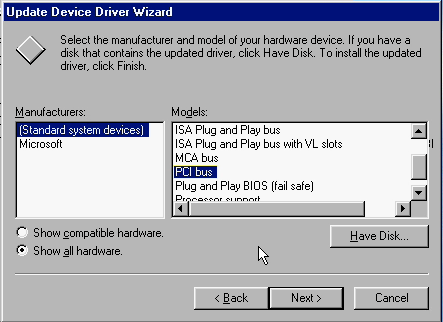
Select "Show all hardware" and in the right list select PCI passenger vehicl:
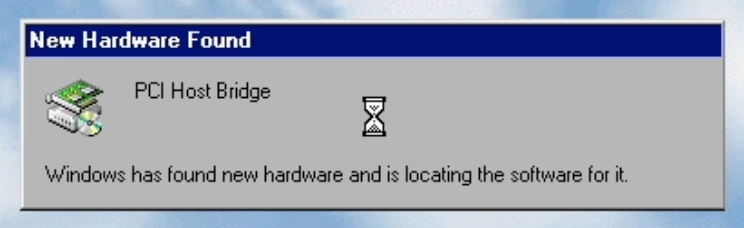
Click Next, finish the stairs and boot the VM when asked to do sol.
Set u the rest of the drivers
When Windows is acquiring started subsequently this, much of new computer hardware is being detected:
For each of these components, undergo the following steps. Sole take a different approach when Windows is detecting the network card, as explained further.
Click Next initially of the Add new Hardware Wizard:
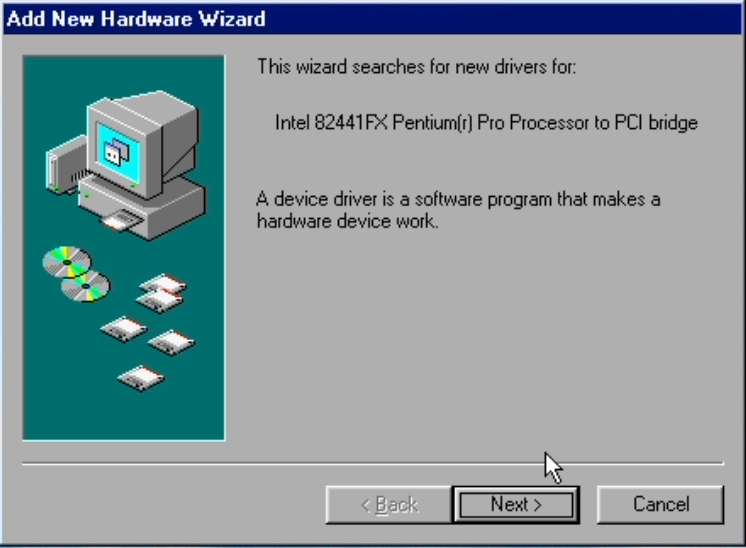
Choice the kickoff option: to search for the best driver and click Next
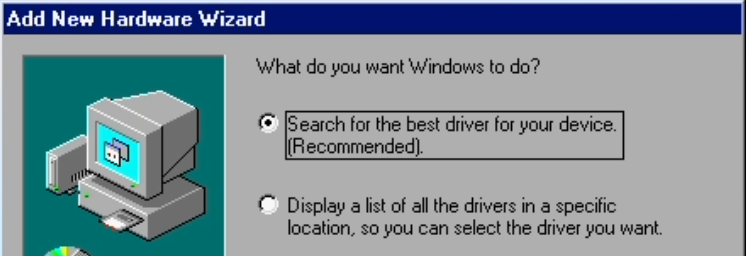
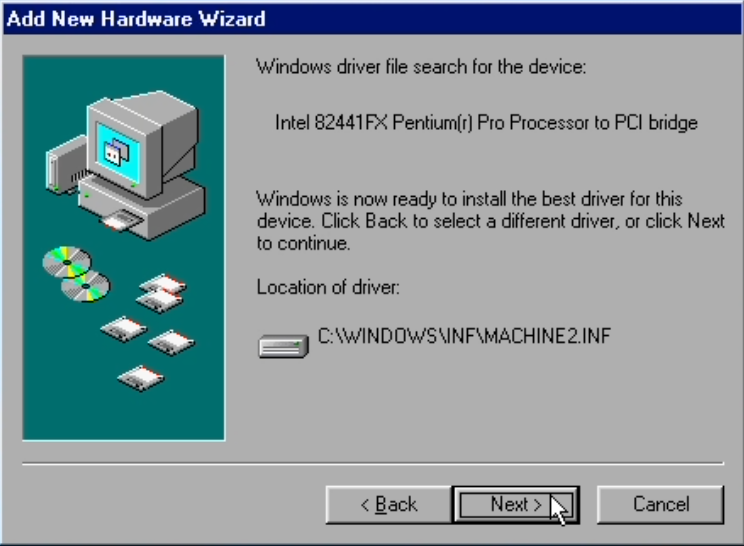
In the following footfall, uncheck all places where to search and dog Next over again. In most cases, Windows will find the correct driver.
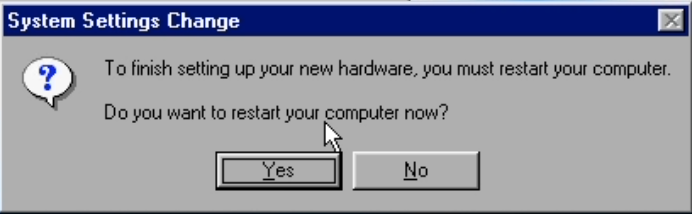
After installing the driver for a specific component is finished and Windows asks to restart, choose for it to not resume:
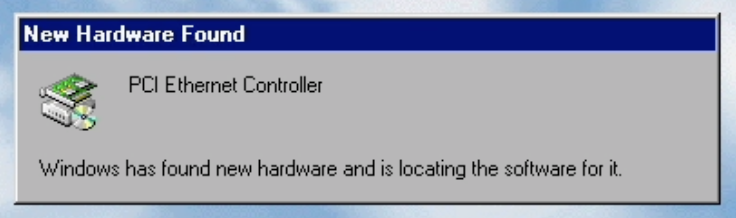
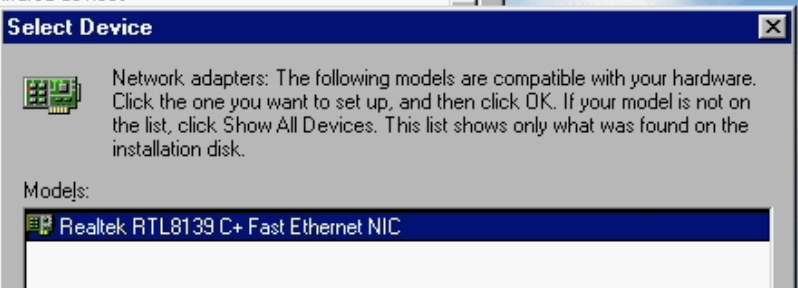
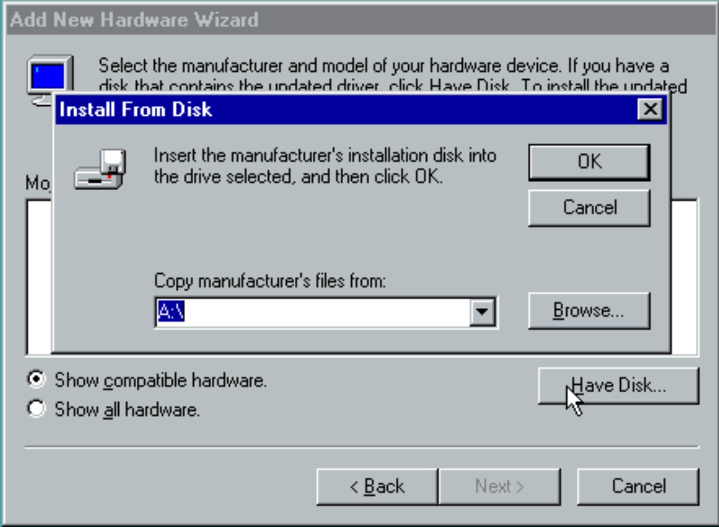
When you see that the new ironware is titled PCI Ethernet Controller, we demand to take a little different approach as that is the network card for which we penury to point to the RTL8193 drivers which we copied earlier:
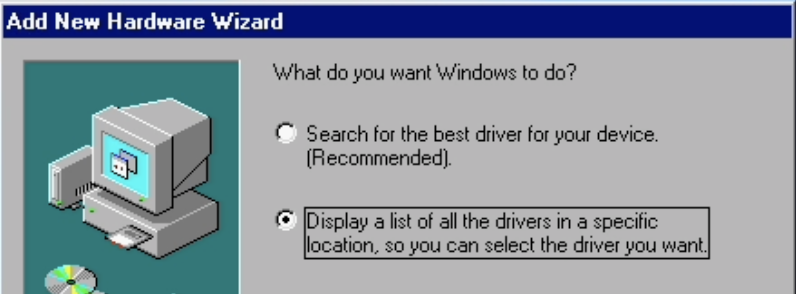
For this, in the first test, just click Next just then select to display a list of all the drivers instead:
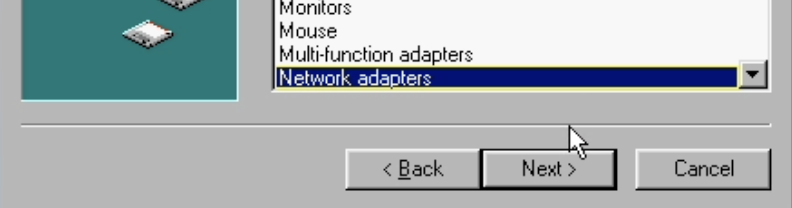
In the list that comes up, take Network Adapters and clink Next again:
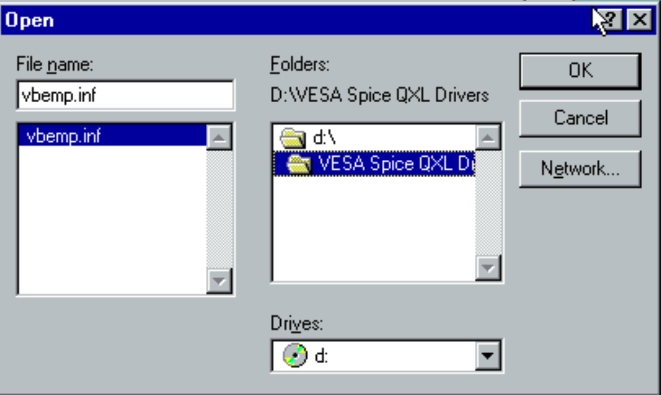
Click 'Have Disk' in the next screen:
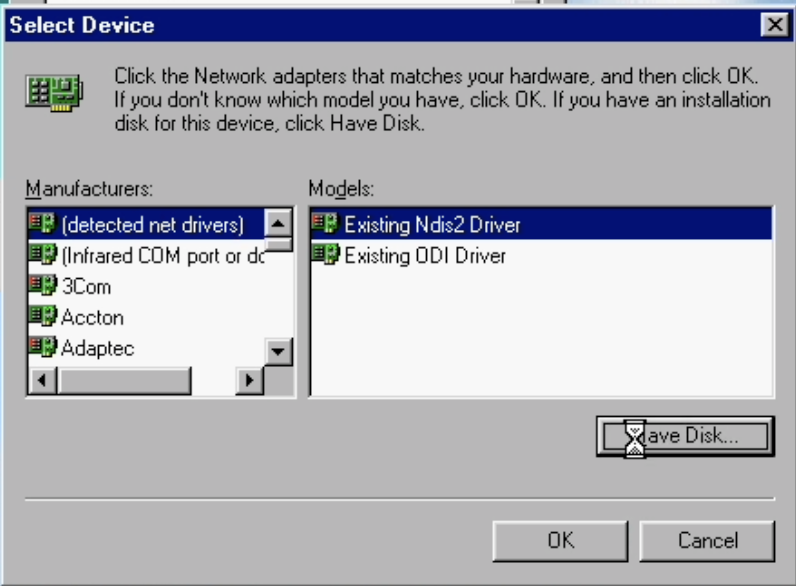
Navigate to the location where we copied the drivers for the network card: (C:\Windows\Desktop\RTL8139 drivers) and click OK:
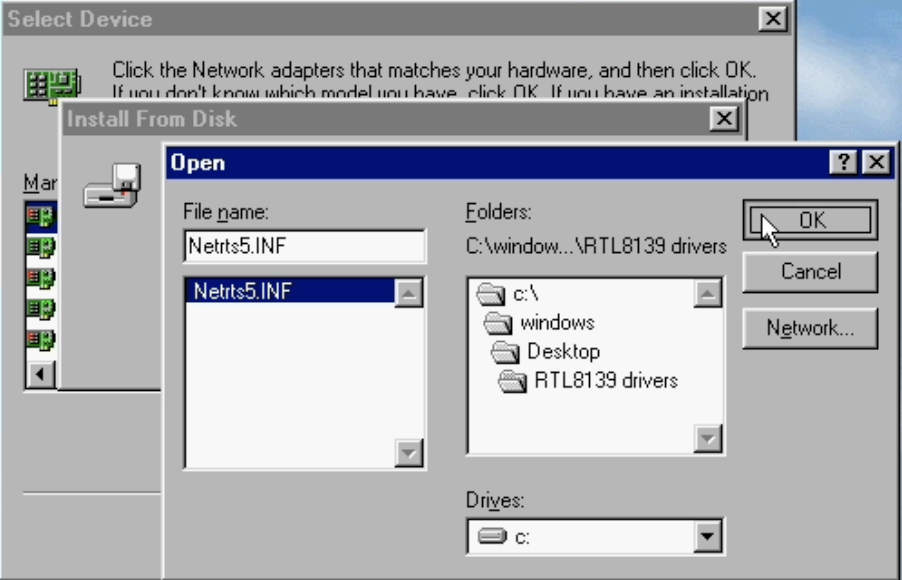
Prize the only option in the list of proposed hardware and go on with the installation of the driver:
Repeat the earlier stairs as explained above for the rest of the computer hardware. When you eventually end informed your desktop, restart the VM.
When the system comes back, more hardware, like the IDE controller is getting detected and another reboot is required…
EDIT: Switch the emulated video card and set u drivers for improved nontextual matter
While playing around with the VM, I noticed some issues related to nontextual matter. As a essential video bill of fare, I chose the cirrus CLGD 54xx. A good reason for that was because that card had drivers included in the standard Windows 98 driver database.
When trying to set the resolution higher, for example 1024×768 you can watch that things doh not flavour as expected:
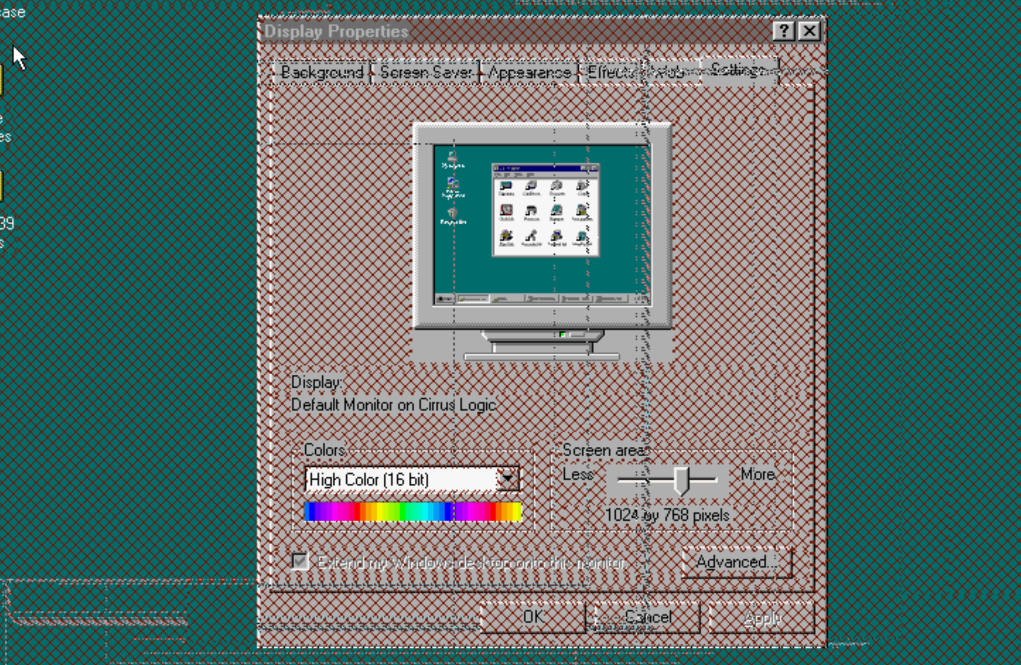
But even though 800×600 looked small at first sight, I noticed strange issues over fourth dimension. Another disfavour, even if a higher resolution equal 1024×768 would work fine, is the aspect ratio. At the time 4 by 3 was definitely the standard while today information technology is 16 by 9 or 16 by 10. and as a result you end up with black borders when squirting the VM fullscreen.
To overcome these issues, I launch a figure called VBEMP 9x: https://bearwindows.zcm.com.au/vbe9x.htm. The final result is a generic VBE number one wood for older windows versions like windows 98.
VBE or VESA BIOS extension defines an improved interface that behind be used by software to access telecasting cards. The VBEMP project basically backported the generic Windows XP VBE driver to something that works along Windows 95, 98 and so forth.
Even better is that the driver has good support for emulated video cards like the ones available in QEMU. And on top of that adds subscribe for resolutions which have a modern 16 by 9 operating room 16 past 10 ratio.
To go far easy to use this, I included the driver on an updated version of the win98tools.iso:
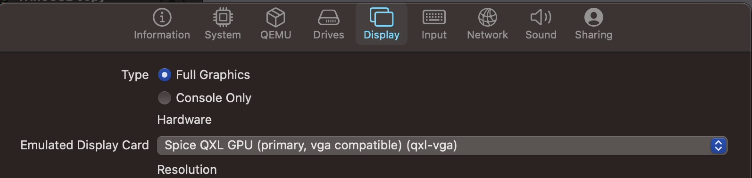
Now to change the emulated video card and to use the drivers, archetypal shut down the VM.
Then, in UTM, right wing click on your VM in the list and prefer Edit. In the Reveal tab, change the emulated TV card to Spiciness QXL and save the changes:
In front booting the VM again, bestrid the updated win98tools.iso every bit explained ahead. Then bug out it.
Once the VM is booted, you will see that Windows detected the denaturised video card. As we have the drivers happening the virtual CD drive, prefer to display a list of drivers and then opt Have disk:
Browsing for the drivers happening the CD and flick OK:
In the upcoming lean, the only option shown is what we need. Click ok and keep going the instalmen
and choose to reboot when asked.
After the reboot, things do not look as expected. We clearly sack't wont VBE up to now. In device managing director we can see that the sexagenarian virtual video card is still thither, causation a conflict with the new one.
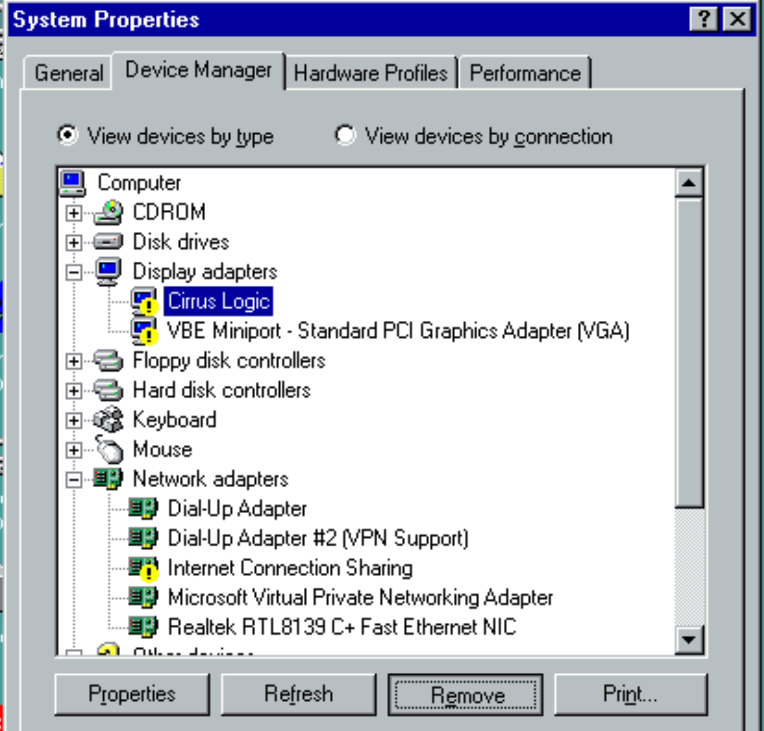
To resolve this, rent out's hit that cirrus logic poster and, you might have guessed IT, execute another reboot.
Erst rebooted, you volition see that you have now a much wider range of resolutions, the graphical issues are no longer seen and American Samoa a bonus, performance got improved every bit well:
After completing this, everything is configured and installed and we can start using the VM.
Step 6) Use the VM and convert files with the host (macOS)
It took a circle of stairs and many reboots but if you'rhenium still following at this stage, all drivers are installed and all components in your Windows 98 SE establis should be amply functional.
One last affair which I wanted to explain is how to get software and files on the VM. The easiest option is to wont ISO files. A lot of games and apps are available for download in this format so it's definitely a good pick. You can use the virtual CD drive in UTM to mount and unmount different ISO images, as we did a fewer multiplication in the in a higher place steps already. Come keep in mind that bank identification number/pool stick or mdf files will front pauperism to beryllium converted to the ISO format before they are usable.
In order to easily exchange files between macOS and the Windows 98 VM we need something different. Unluckily most advanced methods and protocols did non yet exist operating room did but the versions supported became well-advised unsafe in the meanwhile like SMB v1, SCP or HTTPS.
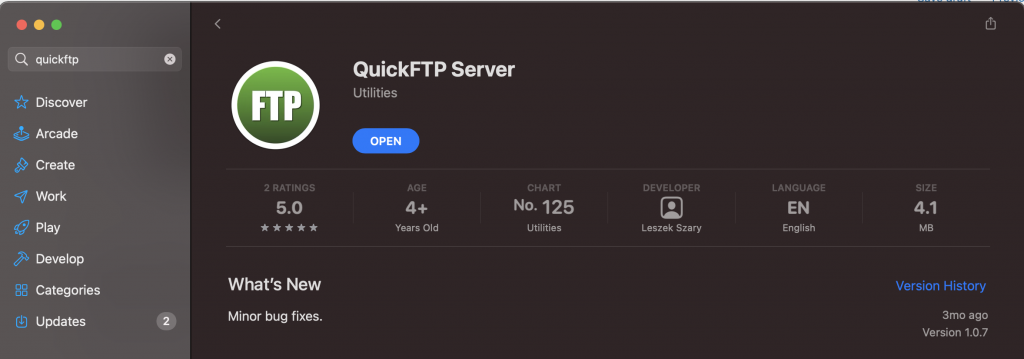
After some searching, for me victimization File transfer protocol, although considerate of considered unsafe as well, worked the best. It's non light to find a working File transfer protocol-server for a Modern macOS version like Big Sur or Monterey but fortunately I base an application called QuickFTP Server. This app is out-of-school and can cost installed from the App computer storage in macOS.
Download and install this app on macOS and start it. In the main screen, select a beginning track. This is the directory which will be getatable from Windows 98 and select a port. The port come has to be higher than 1024 so the default FTP port 21 will not work:
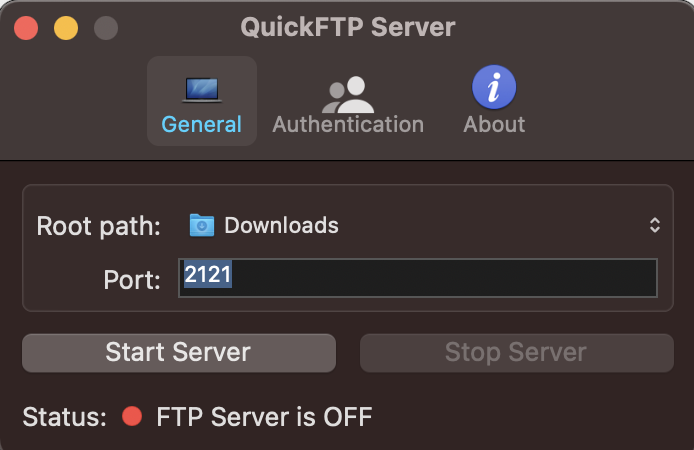
In the Hallmark chit, enter a username and password, this bequeath be required in order to access the files. You can too choose if you require this memory access to be learn-only or read-pen.
And so click the Depart Server button happening the first screen:
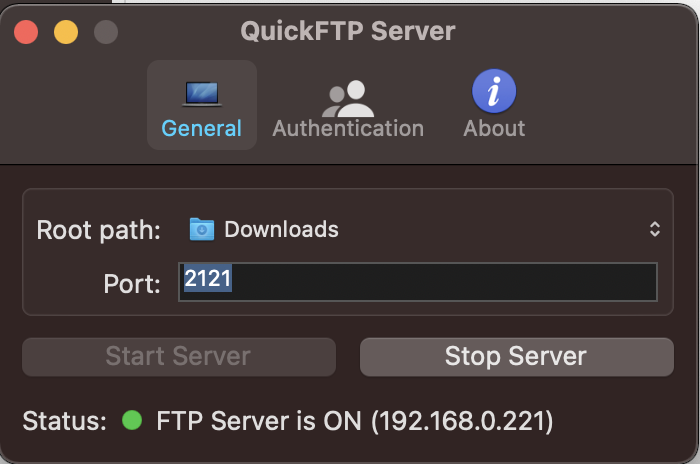
As you can see, this also displays the Information science address of your macOS device. This is the IP (192.168.0.221) which we bequeath take to connect to from our Windows 98 VM.
Second on the VM, as we installed the drivers for the network card and UTM is configured to have that card in a common network with our macOS twist, we should be able to arrive at the IP where the File transfer protocol-server is now listening on.
Unfortunately as we are not using the default File transfer protocol port (21), we cannot exercise the Windows CLI FTP client as information technology doesn't support specifying a port telephone number. Luckily the built-in FTP client in Internet Explorer does support that.
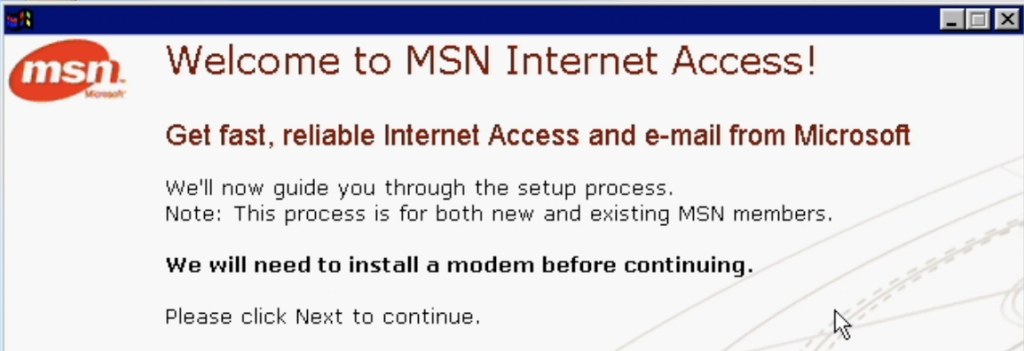
In order to start using Internet Explorer, we testament initial demand to implement the Internet Connection Wizard. Without doing so, we can't set off Internet Explorer as we get pushed to install a modem and setup MSN (non a good deal changed at Microsoft all told those years I guess):
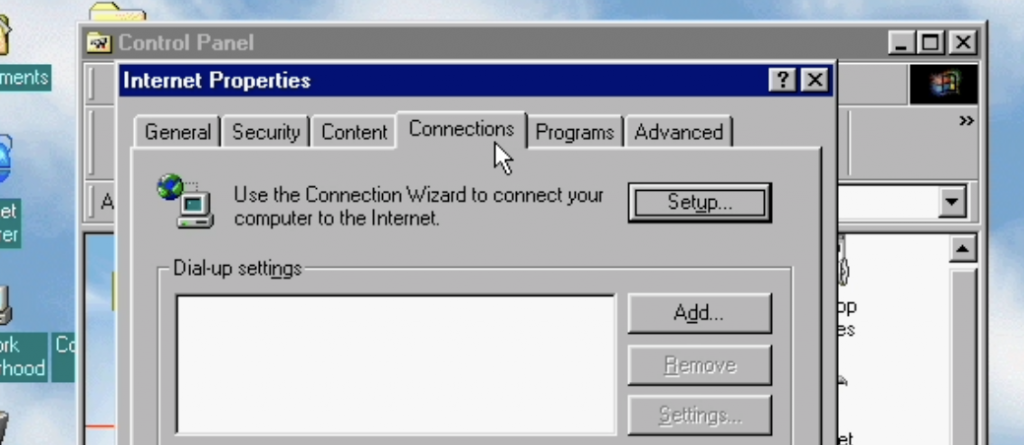
So to overcome this, voyage to: Start – Settings – Control Panel – Internet Options – Connections and click on the Setup button:
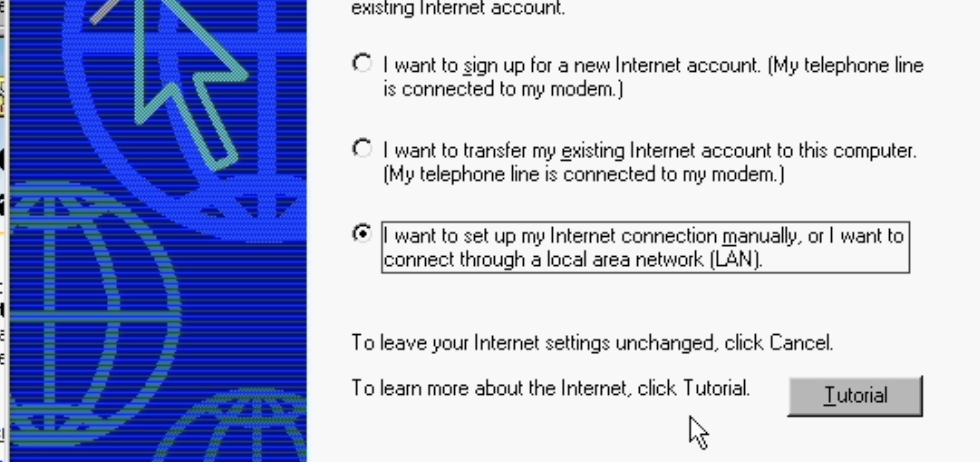
Choose for a manual configuration and click Next:
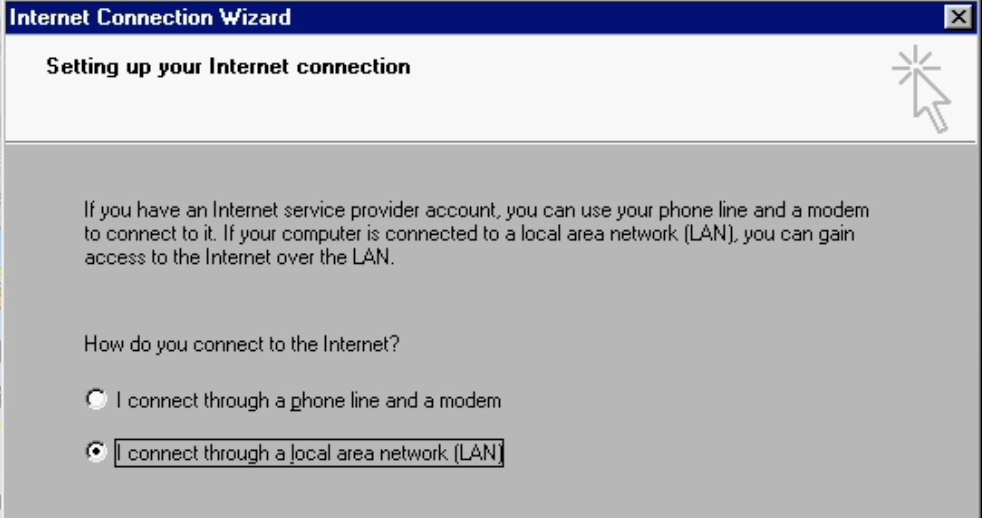
In the next screen, choose "I get in touch through a LAN (Local area network)" and click Next:
And so uncheck the automatic uncovering of the proxy host:
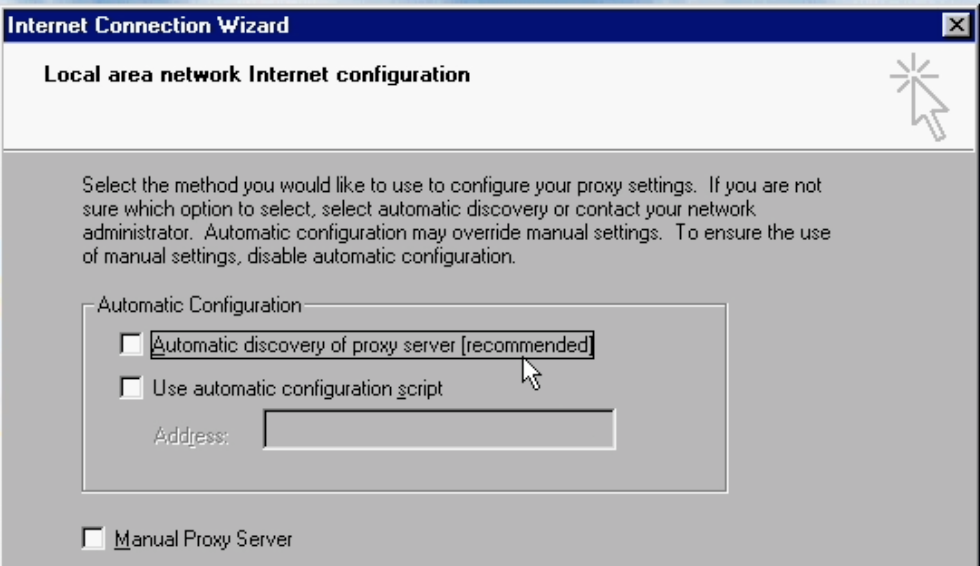
And choose to not set up internet mail when asked.
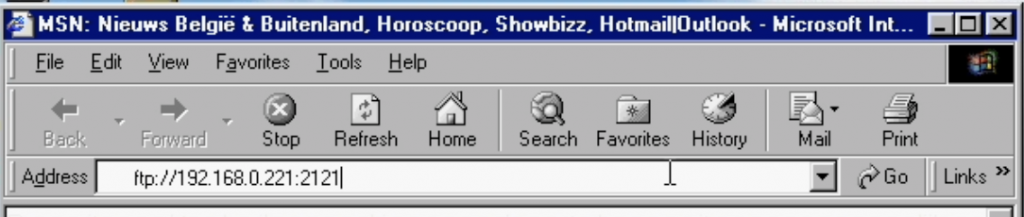
Going through these steps allows us to start Cyberspace Explorer. To tie to the FTP-host which we started on macOS, we give notice enter the following in the address bar: ftp://<IP computer address>:<porthole>. So for my example: ftp://192.168.0.221:2121:
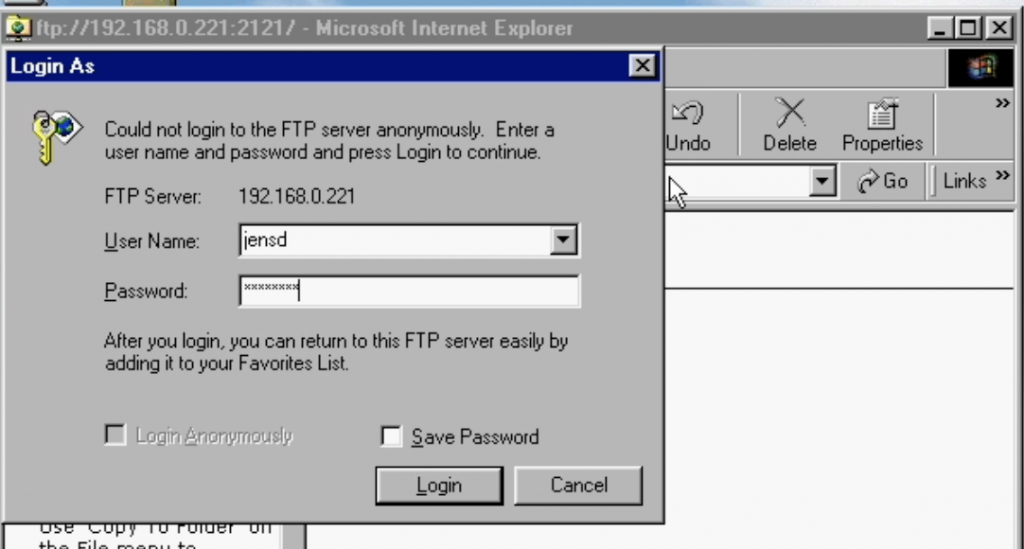
If all goes well, IE will invite a username and parole, which should correspond with whatever exploiter and password you entered in the Authentication tab before starting the Quick File transfer protocol Waiter:
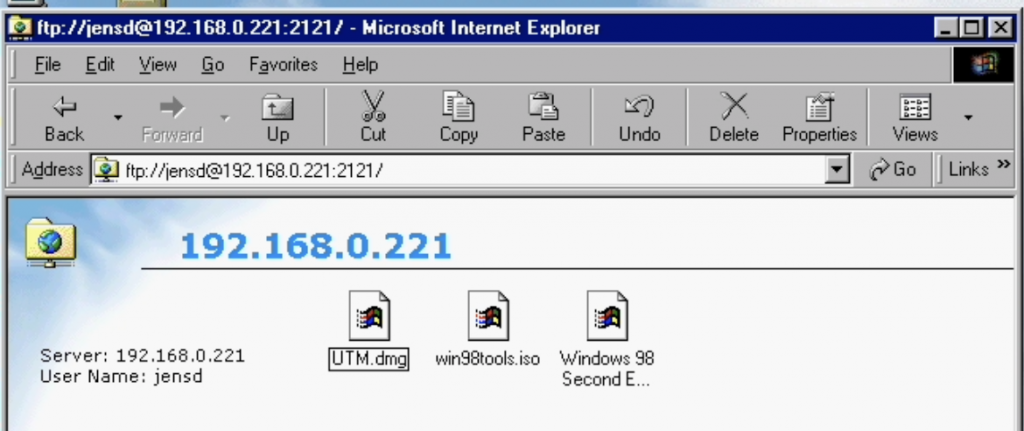
Once logged in, you lavatory just hang back/drop or copy/paste files 'tween the FTP-server and the VM which makes IT pleasing to exchange files back and forth betwixt macOS and the vintage VM:
The ease I leave up to you.
In encase you would need some inspiration, I had a lot of fun with this VM with Duke Nukem 3D, Rollercoaster Top executiv 2, SimCity3000 and Idea Hospital but there is plenty many gettable to explore.
Cant Run Windows 98 With More Than 1 Core
Source: https://jensd.be/1640/windows/run-windows-98-se-on-a-modern-mac-with-m1
0 Response to "Cant Run Windows 98 With More Than 1 Core"
Post a Comment